
Estimated reading time: 8 minutes
I planted a small orchard of hardy fruit trees that I hope will stand up to my short growing season and winter temps that reach -25 or colder. Among them is a pie cherry that is on track to produce enough cherries for one pie, and maybe less.
As I walked past the orchard this week I saw a flock of starlings descend and land on the seven-foot-tall woven wire deer fence I built around the fruit trees. I hurried over to my gun safe and grabbed the first .22 I could reach, paused for a moment, checked the barrel for obstructions, and loaded four rounds into the magazine. I stepped around the corner of the shop, wrapped the leather sling around my elbow, and fired the rifle. The starling I aimed at fell dead to the ground where it was promptly mauled by my black lab.
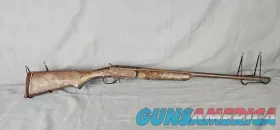
80-Year-Old Rifle – Stevens Model 416
This is the first time I’ve ever shot that gun. It’s a Stevens Model 416 made in 1940. My grandfather, who was twice wounded in WWII, used it to train troops and himself how to shoot. It had likely not been fired in at least 60 years.
The rifle wore a zero power weaver scope with a 3/4″ diameter tube. It was passed down to me when I graduated college and I had never shot it out of a combination of respect for a man who died before I was born, and fear that I might not shoot it accurately enough to make him proud from the grave. I had little faith when I pressed the trigger that the rifle would still be sighted in, but shot as if it were. At 50 yards the reticle was thicker than the starling but the middle of the reticle is exactly where the bullet struck.
Available on GunsAmerica Now


SEE MORE: Stevens Shotguns Adds the 555 Sporting Model to the Over/Under Lineup

Keeping Your Zero On A Hunt
These days I travel often and usually bring a rifle so I can hunt once I get to where I’m going. Most of us live in fear that the scope has been “bumped” and the gun isn’t shooting true anymore. Once on the hunt, we don’t want to be continuing to check zero because rifle shots tend not to attract deer and elk. Rifles can fall out of scabbards, hit rocks, get stepped on by horses, and meet all other possible forms of collision, sometimes without the owner knowing it has happened.
We finally draw down on the critter they’ve been hunting, press the trigger without disturbing the reticle, and miss. It has happened to almost all of us, and there is something easy we can do to prevent that failure.
Table of contents
Never Miss Again – Battle Mount It Up
This is how I set up a scope so it can receive the maximum reasonable amount of damage and maintain its zero.

Due to the eye relief of this scope and the location of the two-piece base, I had to use this two-piece cantilever scope mount in an unorthodox way. However, your scope won’t care whether the cantilever points to the front or the rear so long as everything is mounted correctly.
What You’ll Probably Need

I carry this small set of tools called “Fix it Sticks” which you can get for around $100. Most of the bits you need for field repair, a 1/2″ socket, a handy wrench, and an inch/pound torque head are included in this wallet-size kit. I’ll also be using a magnetic tray to keep scope ring screws from miraculously disappearing, as well as both red and blue thread locker

I start by removing the scope rings. This is pretty straightforward, just don’t lose the screws. The floor is lava.
Pay Attention Here

***Make sure you slide your bases as far forward in the rail sections as they will go before torquing them down. These use a 1/2″ lug and require 65 inches/lb of torque. One of the most common causes of losing a zero is not having the scope mounts slid forward before tightening. With the recoil of each shot, they will slide slightly forward which can cause your zero to shift if you do not do this. A body at rest tends to stay at rest.
Thread Locker Is What Holds Your Zero

Apply one drop of red thread locker to the bottom portion of each ring same to the inside of the top portion. This will fill in any voids and do the same job as scope lapping with the added benefit of chemically fixing the scope in place. You will still be able to get your scope out of these rings with a little force if you decide to move the optic to different rings in the future.

I place a paper towel in my magnetic bowl with the screw heads facing down and apply one drop of blue thread locker to each screw. I evenly distribute that drop to the threads with my fingers before setting them back in the scope rings. Screws with blue thread locker are removable with hand tools, but this adhesive does an excellent job of resisting loosening caused by vibration. Whether in a pickup on a dirt road or the belly of an airplane, your rifle is going to experience long periods of vibration while in travel.
The Final Step For A Battle Mount

Lastly, I add the torque head to my wrench. I tighten the far side screws all the way down, back them off 1.5 turns, then tighten the near side until snug. This is a huge time saver. Check that the scope is level and the eye relief is correct for you throughout the power range of the optic and make any adjustments necessary.
Now I ensure the gaps between the rings are the same, front and rear, left and right, on the scope rings. I tighten them down in a star pattern, front left, back right, back left, front right until I have everything torqued to the prescribed amount, which in this case is 25 inch/lbs. Usually, the torque specs will be printed on the packaging your scope rings came in. Without a torque wrench, people tend to over-tighten their scopes, which can crush the tube and cause a variety of malfunctions. If the magnification ring is difficult to turn on your scope, your scope rings are likely too tight.
Conclusion
If you go through these steps you will have much better success at maintaining your zero as your rifle experiences the tough conditions we put them through. These bottles of thread locker cost me $9.99 at the hardware store. That’s some of the cheapest insurance you can buy, and a small price to pay on your road to never miss again.
*** Buy and Sell on GunsAmerica! ***
is an outfitter, professional hunter and cattle rancher from NE Oregon where he resides as the fifth generation of his family to raise cattle, hunt, and fish on the 6 Ranch. He studied history at Adolf Øien Videregående in Trondheim, Norway where he also competed on the Norwegian National Greco-Roman wrestling team, then studied Literature and Writing at the University of Montana Western in Dillon, Montana. Afterwards, Nash served as an Armor Officer and platoon commander in the M1A1 Abrams main battle tank in the US Marine Corps for five years. Nash was wounded in Afghanistan and received two Purple Heart Medals and after a period of convalescence was subsequently retired. He returned to the 6 Ranch and resumed guiding and outfitting, with a focus on other combat wounded veterans. Nash has guided salt and freshwater fly and gear fishing, all kinds of hunting, and back country wilderness trips since age 14. He hosts the 6 Ranch Podcast, and you can learn more about him on instagram @6ranchoutfitters.
In my opinion the reversed cantilever is more solid than attached as designed. The further apart you can make the attachment points on the scope and on the rifle the more stable the scope is able to be.
Excellent article and very well written. It is nice to read articles, rich in detail and facts that immediately resonate with you as being written by someone that knows exactly what they hell are talking about. Then I read his biography at the bottom of the article and that says it all. He has a wealth of experience from which to draw and it shows. I would much rather read the thoughts of men like this than most all other gun writers. Reminds me a bit of reading old articles by Elmer Keith.
Hope you publish more articles by him more frequently.